Sunsets and Photo Walks seem to go together. It is a great way to learn exposure, while photographing a sunset. Exposure affects the colors in the sunset, whether or not a foreground object becomes a silhouette, or simply how to prevent the flash from going off. It’s helpful to have a knowledgeable photography instructor to help hone these skills.
The Edmonds waterfront is a great place to see the sunset, and experience a photo walk. There is a great abundance of subjects to photograph, including the ferry boats, sail boats, gulls, bald eagles, harbor seals, and more.
I would love to see you at my next photo walk on August 25th, 2016. Sign up is through the City of Edmonds at http://www.reczone.org.
The Spirit of Place is one of my ideas or personal concepts about photography. At its core is the idea that photographs are created by the photographer through use of light, exposure, and composition. It is our personal view-point or way we translate the scene in a visual way.
This photo uses shadow and light, lines, and people to create the composition of the place. In this image, the viewer sees the blowing sand (top of dune), the rocky wall in the foreground, and the people making their way up the sand dune. It speaks of man and nature co-existing in the late afternoon light.
Nature is one constant in our lives that is ever-changing, yet remains the same. The challenge for the photographer is to take existing elements, and create a pleasing photographic image. Photography is a tool to document the world around us, yet our personal view-point is always present in our images.
The blowing sand in this photograph creates designs on the sand that mimic the wet sand reflecting the blue sky and the ocean waves. In this image, one could see the hillsides in the background as repeating the wavy shape created by the sand and ocean. The scene is completed by all the people enjoying the beach, whether walking along the water or sitting in the sand. By including people, I have given a reference to the size of the landscape.
Another way to look at this scene is to eliminate or hide the man-made or man’s influence upon the scene. By moving the point-of-view, this image the viewer sees the ocean waves and four gulls. Yes, there is some indications of civilization, but they are not the main components of the composition.
Now to end this entry, I’ve added a little different concept. This image is titled Windy. It leaves the question, how do we as photographers show wind or other elements in our images? What is that special ingredient that we have included to make our photograph stand-out from the millions of images on the internet?
Stay tuned for more. . .or simply join me for my Spirit of Place workshop on the Oregon coast in June.
I seldom get the opportunity to stay in the city, and photograph all the different types of light. Composing in the city is similar to Landscape photography, but the lines are more linear and defined. I find that it give me a different perspective to take back to the natural world I love to document.
The shot above is an example of “outside” the box composing. This long exposure was taken through the hotel window at F22. The yellow cast to the image is the temperature of the street lights. The “spotting” effect is the dirt on the outside of the window. All this together creates a “grunge” feeling for the photo.
Photographing the city at night, illustrates the different temperatures of light. The colors that look “true” are most likely daylight balanced fluorescent or LED. The yellow is tungsten or incandescent. The green cast is most likely regular fluorescent.
Daylight brings another look to the buildings. I love the reflections in the modern glass buildings, mixed with the historical brick buildings. The strong use of diagonal line in the above photo guides the viewer’s eye through the picture. Diagonal lines add a feeling of motion to a static image. The reflection in the glass is the buildings across the street light by direct sunlight. I used a polarizing filter to enhance the blues, and was careful not to eliminate the reflection in the glass.
Cities are filled with contradicting images and ideas. The above image is bullet damage to a 1/2 inch glass window. I like the story it tells of prosperity (see inside the building) and the reflection of the historical buildings across the street. This building was a corporate headquarters, and is was situated in an area of diverse stories of prosperity and decline. The lines in this image are the arrangement of the bullet damage which are taped, and the diagonal lines of the buildings in the reflection.
The image below is a combination of a sculpture and the Tribune tower. I intentionally framed the tower with the brightly colored sculpture, and used a large depth of field to bring out sharpness in the foreground, mid-ground, and background.
Light is everything when it comes to photography. These three photographs were taken on the same evening. To the east towards the coastal mountain range, the weather was thunder and lightning. Along the coast, the clouds created a dramatic sky for the coming sunset.
The top photo shows the warmth of the late day light in the yellow tone to the green grass on the sand dunes. The dramatic clouds were either dark grey or white, and contrasted against the brilliant blue sky.
The photograph below is a simple composition of the sky and clouds. One of the tools used for the blue sky is a polarizing filter. For digital cameras, the filter must be a circular polarizing filter.
The white balance on these images is daylight, or simply use the AUTO setting. Minor adjustments can be made in the Digital Darkroom on the computer.
The bottom photograph is the sun peeking through the dramatic clouds. The sun starred because of the large aperture setting on the camera. Each of these photos was shot on the manual setting for maximum control over the final image.
Remember, using manual settings for exposure give total control over the final photograph. I am available for private consultations, lessons, and individual/group instruction (both in person and online).
Spring has sprung in parts of the world, and the flowers are coming forth. Often times, locations are crowded with people when the light is best for shooting. In the Puget Sound area, spring means cherry blossoms on the University of Washington campus, the Skagit Valley Tulip Festival, and Washington Park Arboretum. Every season has its crowds. . .so, how do you find the photograph?
In the photo above, the throngs of people are obvious, and the garbage cans are over-flowing. The scene is quite noisy, and full of activity. Everyone is out because of the sunshine and the cherry blossoms. This is Sunday on the University of Washington campus (at the Quad). It is late afternoon light, which is warmer than mid-afternoon.
One way to cut-out the crowds is to choose selective portions of the buildings and cherry blossoms. The image above shows the Gothic architecture against a vivid blue sky, and framed with the subtle pink cherry blossoms in front. The crowds are below the bottom of the frame, and the photo takes on a peaceful quality. It exudes quite afternoon on campus.
Another way to exclude the crowds is to change perspective. This shot is looking straight-up under the cherry trees. The branches become a linear component of the composition with the repetitive pattern of the cherry blossoms. The only limit to the possibilities is one’s imagination. . .
Generally speaking, photography is the use of light to create an image. Night is without the sun, so light sources are created by humankind. The photographer uses these sources of light to create artist renditions of night scenes, fireworks, the moon, or portraits.
In the exposure equation, the photographer needs to manipulate either or all of the following: ISO, Aperture, or Shutter Speed. It is advisable to use a tripod.
The first image here is from a large fireworks display. I used a tripod, and a long exposure to capture the lines of light. The exposure was F11, 8 seconds at 125 ISO. The watercolor wash feeling of color is from the fireworks reflecting off the smoke.
TIP: Pick a spot to shoot from, pre-set the exposure, and use a tripod/shutter release.
In this next photograph, the fireworks are used to create a portrait of the child. This is a sparkler, and it casts an incandescent light color on the subject. The green light in the background is fluorescent. This was shot with a Daylight White Balance. The exposure is F5.6, 4 seconds at 100 ISO. I used a tripod.
The color of the sparkler will show in the photograph. This was a gold (or yellow) sparkler. It’s good to dress the subject in medium-toned clothing, which will stand-out from the dark background and bright light of the sparkler.
TIP: Have the person hold as still as possible, while moving the sparkler.
This last image is of the “Super” Moon last month. The exposure for this image is F16, 1/100 second at 400 ISO. The moon is very bright, due to the fact it reflects the sun’s light. To expose it and show the craters, the photograph must be under-exposed. This means to let in less light than the light-meter in the camera indicates as the correct exposure.
For more detailed information on exposure and camera operation, I will be teaching classes through the City of Edmonds this fall.
This bald eagle is flying in after missing a fish in the ocean. This is at Neskowin.
“It was perfect for all levels. It was a great combination of technique and artistry.” Susan H.
We will have minus tides during this workshop, which will allow students to view and photograph tide pools, walk closer to bird nesting areas and marine mammal resting areas. It’s a great opportunity to learn the details of bird and marine mammal photography, and shoot at beautiful locations. The coastal waters are filled with harbor seals, gray whales, and sea birds during the late spring season.
These are nesting cormorants on the Oregon coast. These can be viewed at low tides, in the nesting season.
The workshop starts in the classroom, with an interactive presentation about exposure, techniques and equipment. Then, students go out into the field and practice what was learned in the classroom, ask questions and learn how to spot wildlife. Composition is discussed through-out the workshop, both in the classroom and in the field. The workshop is about 30% in the classroom and 70% shooting in the field with instruction.
This California sea lion was resting on the rocks.
This last photograph is the students photographing harbor seals in the surf. Most of the subjects can be photographed with a 400mm lens or shorter. It is recommended that students bring a tripod. For more information or to sign-up, visit Sitka Center.
Last year’s workshop students are photographing harbor seals playing in the surf.
From trickles of water to roaring flood-stage torrents, waterfalls are an ever-changing photographic subject. Their structure changes slowly over time, but the water falls differently every second. If one took 10 photographs in a row of the same waterfall, each would look different.
Below is an image taken of a small creek. This small area is isolated by using a telephoto lens, then cropping top/bottom of the image, to create an expansive feeling to the photograph. The motion of the water is in-focus. To accomplish this, the shutter speed needs to be at 1/60 second or faster. It is dependent on the speed the water is flowing. With an image like this, it is best to use a tripod to stabilize the camera and be selective about composition. This was taken on a sunny day, and this portion of the creek was in the shade.
TIP – When using a tripod, remember to turn-off the image stabilization on the lens.
This is a small portion of a stream cascading down and over rocks.
Waterfalls come in all shapes and sizes. What makes each unique is the way the water has sculpted the rocks surrounding it. The image above was a small section of a creek. The image below is much larger, and the first falls above a gorge that ends in a 50 +/- foot waterfall. This was a foggy and over-cast day in Mount Rainier National Park. The water in this image is not crisp, yet the rocks are sharp. To get this effect, the shutter speed needs to be 1/8 second or slightly slower. With these shutter speeds, the camera needs to be stabilized on a tripod or other method of stabilization. The aperture was F22, which created a larger depth of field, in comparison to the image above.
TIP – When a tripod is unavailable, try using a rock, tree or other object in the environment to stabilize the camera and/or one’s self.
This waterfall was just above a small gorge that ended in a larger falls. It is in Mount Rainier National Park.
Time of year plays a part in capturing great waterfall images. The photos above were taken during the summer months. The image below was taken in the fall. The leaves have fallen from the trees, and offer a full view of the Whatcom Falls. The ground is covered with autumn colored leaves, adding color to the forest floor. This was taken on an over-cast day in October.
The “milking” effect of the waterfall is due to a slow shutter speed. In this case, it was 1/5 second, and a bridge rail was used for camera stabilization. This was shot with a wide-angle lens, and the aperture was F10.
This was taken in the fall, and is a wide-angle shot of Lower Whatcom Falls.
This last image is Snoqualmie Falls at flood stage. The roads to the waterfall had been open a couple of hours earlier. It was flowing at 78,000 cubic feet of water per second, and it was incredibly loud. This was taken with slide film, and scanned to digital.
These locations are great to photograph waterfalls. It takes some planning to capture the photographic image one is seeking. The things to consider are weather, time of year, equipment, and accessibility to the location. In addition, it is good to factor in the costs associated with travel, food and/or lodging. For more tips and instruction, consider contacting me for workshop information.
Happy Shooting. . .Karen
This is Snoqualmie Falls with 78,000 cubic feet of water per second. The road to the falls had opened earlier in the day.
Late fall and winter weather is happening in the northern hemisphere, and it presents different photography challenges. The weather plays an important part at this time of the year. It is more likely to be windy, stormy, rainy, foggy or snowy at our outdoor destinations. The leaves have left the trees in many areas, giving fewer hiding places for wildlife and birds. The landscape takes on a different “feeling” than the warmer months of spring and summer. The colors change, and daylight hours are shorter.
During strong winds and stormy weather, birds seek refuge in sheltered areas. This image below was taken during strong winds. This great blue heron is sheltered from the winds by the marsh grasses, and is feeding in the shallow water. In this image, he is cleaning his feet. There were several great blue heron roosting in the tall grass behind this bird. The weather brought these birds closer to the walk-way through the marsh, and made them easier to photograph. Other birds finding shelter in the marsh were Northern Shovelers (ducks) and Killdeer. Small song birds were feeding in the cattails and trees.
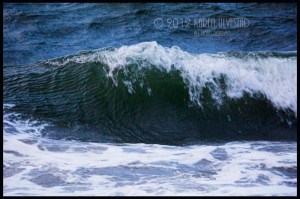
The beach is a wonderful location during high winds or stormy weather. In this photograph, the wave is coming into shore, and is about 4-6 feet tall. It wasn’t raining, but the winds were very strong. It is good to watch the surf, before going onto the beach, to see where the high-water mark is at. Even with this information, the wind can send waves higher on the beach. On the ocean, these are called sneaker-waves. They can pull people into the water, and can be deadly. It is important to be prepared for the environment and weather.
It is important to wear the appropriate clothing for adventures during the winter. Hypothermia can affect those who are not prepared for rain, wind, snow and colder temperatures. It is good to dress in layers, with a good water-repellent shell over the top. The wind will drop the temperature (wind-chill factor), and the cold can hurt exposed areas of skin (hands, fingers and faces). It is important to wear footwear that will keep feet warm and dry. This type of equipment can be found at outdoors stores, such as ski shops or REI.
Camera batteries will lose their charge faster in the colder weather. It is good to bring an extra battery, and keep it in a warm place (pocket near body heat). Most camera equipment is water-resistant, but it depends on the manufacturer and model of the equipment. It is good to keep the gear dry with a good camera bag (water-proof), covering for the camera/lenses and a quick-dry cloth to dry any water that does get onto the equipment.
The photograph below illustrates being prepared for the weather. More later. . .
Since photography is based on light either natural (ambient) and introduced (flash), low lighting photo opportunities gives a photographer many choices on “how to take the shot.” Basic equipment should include a camera and tripod. The rest is up to choices about exposure and/or adding or subtracting light.
This first image was taken at dusk. The sun had been down for about 15-20 minutes before I took this shot. I used a tripod to keep my camera steady. I wanted to capture the lights of the ferry dock, and have the rocks in the fore-ground lit as well. I exposed this image for the lights and last colors of the sunset. In the Digital Darkroom, I worked on bringing the exposure into balance, which reflected what I saw when I took the photograph. I worked a lot with fill light and contrast.
ISO 100, 1/30 sec., f7.1
In the photo below, I had a different lighting situation. This was shot during late winter, and the sun had already set or near sunset. The Barred owl blended into the surroundings well, and I pushed the ISO to 2500. I didn’t know if the photo would turn out, because of the poor lighting. A flash would have been nice, but I would have lost the details in the background. The background would have gone very dark with a flash, because of the difference in light between the owl and the sky. In the Digital Darkroom, I adjusted the exposure, and de-saturated the color. This is the final resulting photo.
ISO 2500, 1/80 sec., f5.6
The scene below is a different situation than the previous two images. The lighting challenge is between shadow areas and direct sunlight. I chose an exposure in-between the two extremes, so I could collect enough details in the blacks and whites to work with in the Digital Darkroom. Even with this exposure, I still have some blacks and whites without detail. If one looks closely at the photo, the sun reflected in the window made refraction marks through the image.
For more information about these processes, I’ll be teaching workshops on the subject, and writing about this in future blogs. My workshops are offered through Pacific Northwest Art School, Nature’s Photo Adventures, Sitka Center, and the City of Edmonds.